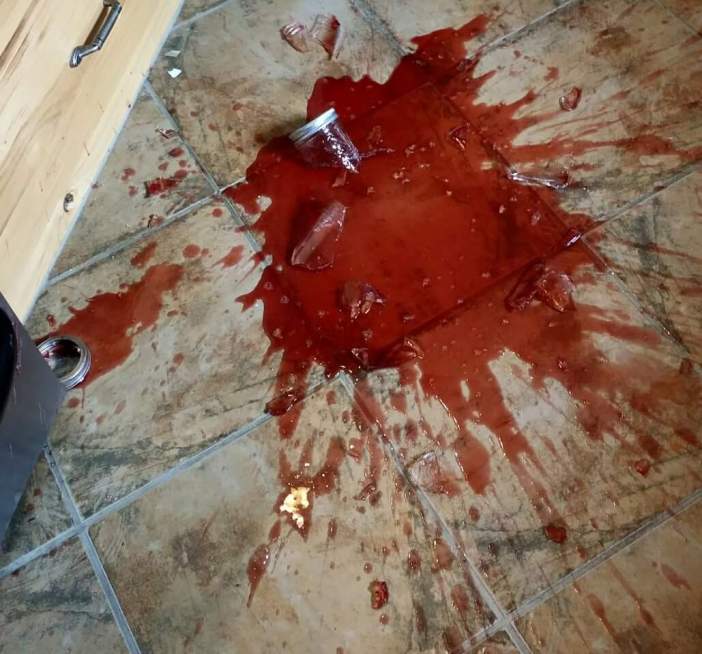
After watching and helping with this fun project called “canning” I have taken the liberty of making some notes that may help others get the most enjoyment possible out of this experience. To start with, you need to go out in the bush and gather up your base stock for your jelly. Anything you can think of will work apparently. Berries are the most traditional but whatever you can grab and carry home will work, including trees, roots, flowers and blooms. Keep in mind that the buds or berries that no other creature on this planet will eat are, by default, very readily available. The list of items suitable for making jams and jellies is really endless so go ahead and clean out your fridge too; old fruit, leftovers, whatever. The next step is to process your treasures to pull the natural flavour out. I actually thought that this would be the complicated part as it requires enough tooling to make Walter Whites lab look like a kindergarten classroom, but no: after you have set up your entire kitchen like an episode of Breaking Bad you take your precious fruit and POUR BOILING WATER OVER IT. That’s it. The excess is strained through something called “Cheese Cloth” which, I might add, looks nothing like cheese. It is just cloth. If you don’t have access to magic cheese cloth simply grab that old Tshirt with the BBQ sauce stain on it and you have the same thing. I suspect you could also strain your mixture through a fuel filter from a 72 Dodge without any problems, but I never got any say during this process so I could not test that theory. Once you have strained all of the rocks, bugs, spiders, and dirt out of your forest waste you have to pause. Stare at it. You must say “OOOH” and “AHHH” repeatedly at the colour. Call the kids. Take photos. Whatever you have to do to celebrate and cherish this moment. This is especially important as this is the exact moment that the fun ends. While you continue to admire and gush over the exciting colours you have invented go ahead and bring your mixture to a boil. Once its boiling you get to add the sugar. Now what no one tells you is that you need A LOT of sugar. In fact you need more sugar than you are going to have finished jam. I don’t know what kind of voodoo happens at this stage but you somehow manage to fit about fifty cups of sugar into each jar. Seriously, back the truck up. As an added bonus, this much sugar will also cover up the taste of whatever kind of wild poisons you have boiled out of your gatherings. Now that it has boiled, your mixture is ready to put into your jars. You know, the ones that you forgot to sterilize while you were “OOHING” and “AHHING” at the colour? It’s time to frantically start trying to wash them while continuing to stir your boiling sugar soup that is beginning to solidify in your pot. Timing here is critical so don’t pause to think how organized your grandma was because she had all this crap done ahead of time, I promise you. You are finally ready to fill and cap your jars. This part is quite boring so go ahead and smash a jar or two on the floor. Once you are dancing around in a pool of boiling molten sugar interlaced with jagged shards of glass you will get quite an adrenalin bump. Get a few shards stuck in your foot and it now qualifies as an extreme sport. Don’t tell Monster Energy, they will want to sponsor this too and nobody wants a giant M on the side of their jam jar. Once the jars are filled and sealed it is time to clean up and admire your work. Cleanup is a little tough because your jams and jellies have now set up completely solid: On the spoons, in the pots, in the bowls, where its spilled – all of it is now cement hard. Except for the stuff actually IN the jars. For some reason that didn’t set up at all. Apparently you tweaked the recipe just enough for it not to work. No problem, this was so much fun you can look forward to doing it again. Or just change the name from Jelly to Syrup, light the kitchen on fire and call it a day. Who knew that gramma was a master chemist?
